HowTo – Lab alkalinity and pH testing
Priority: low
Updating: rare
This HowTo describes the process of measuring alkalinity and pH of water samples in lab, with a main motivation of contributing to Piper diagrams.
Change log:
| Date | Who | Comment |
|---|---|---|
| 2022 01 06 | Sp17 | Created initial version. |
| 2023 06 21 | Sp17 | Converted to Markdown. |
| 2023 07 25 | Sp17 | A few refinements after today’s lab session processing 61 samples. Changed the HowTo to 100% completed. |
| 2023 09 29 | Sp17 | Added details about using the alkalinity check vials and pH meter checking, in the Steps section. |
1. Objectives
- Measure pH and alkalinity with Hanna meters.
2. Quality assurance aspects
- Limit the number of times that original frozen samples are thawed.
- Test selected samples twice to estimate repeatability.
- Eventually, check frozen samples for consistency during variable frozen storage time.
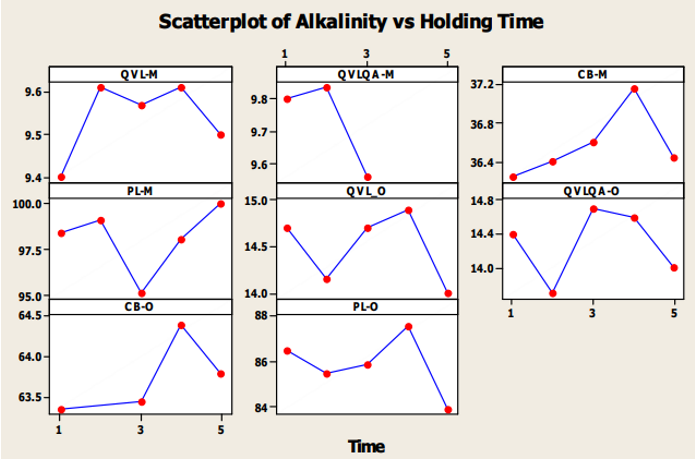 Source: https://www.gov.nl.ca/ecc/files/waterres-quality-background-nl-parameter-stability-study-2009-10.pdf
T1=same day, T5 21 day holding in fridge.
- lab pH to field pH when field data are available.
- Check the meters against standards.
3. Preparing aliquots before test day
This requires 13-15 mL of sample, which is sacrificed in the analysis process. It is convenient to make this aliquot while preparing pesticides aliquots for DEC. The aliquot containers should be labeled with sample identities, such as sequence numbers. Store aliquots in refrigerator until test time.
4. Equipment needed
- Hanna freshwater alkalinity meter, HI775. Includes meter and glass cylinder cuvette, 1 mL syringe for reagent dispensing. (Can use any 1 mL pipettor with tip, such as repeater pipettor.)
- Hanna or similar pH meter.
- Cups to hold samples being tested for pH. Cut-off 60 mL Nalgene bottles or small glass beakers are good for this; they need to have the 13-15 mL of sample aliquot rise over the pH meter sensors.
- Container to receive spent sample aliquots after testing. 1L Nalgene bottle for reuse can handle at least 55 samples and washwater.
- Spray bottle for deionized water.
5. Supplies needed
- Alkalinity test reagents, Hanna HI775-26. Available from Amazon Business. 30 mL container is rated as sufficient to test 25 samples. 1 mL per sample. There are no hazard warnings on the reagent container, thus it does not need to be handled as hazardous waste.
- (optional) pH buffers
- (optional) alkalinity certified standards, Hanna HI775-11. Store 5-30C, do not freeze! Protect from exposure to light. These are reusable. They do not require adding the test reagent.
- First test 2023 01 06 yielded 97 ppm, acceptable range is 90-110, specification says 104.
- Deionized water to rinse sample containers between testing for pH and alkalinity.
- (sometimes) Batteries for Hanna pH meter (3x type LR44) and alkalinity meter (1xAAA).
- Nitrile gloves to reduce fingerprint deposition on alkalinity cuvette.
6. Steps
In advance on test day:
- Prepare a table in project’s lab logbook with columns for sample identity, pH value, and alkalinity value. Include the analyst ID and date.
- Turn on the pH meter and set for pH. Turn on the alkalinity meter.
- Periodically: check the pH meter for performance using three buffers. Record results in lab logbook. Recalibrate if there was too much drift.
- Periodically: check the alkalinity meter using Hanna certified alkalinity standards or a stock solution having known alkalinity. Record results in project’s lab logbook.
For each sample:
- Rinse the pH test container and alkalinity cuvette with deionized water and shake them out so there are no droplets to dilute the next sample. Alkalinity cuvette outside must be dry and free of smudges to avoid interference with optical testing; wipe with microfiber cloth or kimwipe.
- Rinse pH meter tip with deionized water spray, shake off.
- Pour entire 13-15 mL sample into pH test container.
- Immerse pH meter, allow pH to stabilize. record pH. (Meter compensates for temperature thus temperature does not need to be recorded.)
- Pour 10 mL from pH sample container into alkalinity cuvette. Cap.
- Press sole button on alkalinity meter. Wait for C1 prompt. Blank it by inserting the cuvette then pressing the button.
- Wait for C2 prompt to add the alkalinity reagent. Add 1 mL alkalinity reagent to sample in cuvette. Cap.
- Press button, read and record alkalinity.
- Dump sample with alkalinity reagent into waste container.
Afterward:
- Clean alkalinity cuvette and (if used) syringe reagent dispenser with deionized water.
- Clean container used for pH testing with deionized water.
- Dump waste container in lab sink, flushing with ample cold tap water. Rinse waste container with deionized water, return to container reuse shelving.
- Clean bench where worked.
Quality assurance add-ons:
- Do duplicate analysis, same sample twice. This requires setting aside two >10 mL aliquots from the same original sample.
- Test alkalinity meter against standards at least quarterly.
- Insert cuvette A into the meter.
- Press button when prompted (c.1).
- Put cuvette B (colored) into meter.
- Press button when prompted (c.2).
- Record value in lab log. Target value is 100 +/- 10 ppm CaCO3.
- Test pH meter calibration before each lab session or field trip.
- Note: Use reasonably fresh pH buffers, based on expiration dates on labels.
- Test against all three 4.01, 7.01, 11.01 buffers.
- Record results in lab log.
- If any value is more than 0.1 different from standard, recalibrate meter using at least two buffers and test against all three buffers again.