HowTo – Monitor well installation and maintenance [90%]
Priority: high
Updating: mature
This provides guidance about siting, installing, and maintaining monitor wells specific to the project. These wells complement existing potable, monitor, and sub-potable wells from which samples will also be collected.
Change log:
| When | Who | Comment |
|---|---|---|
| 2021 03 13 | Sp17 | First skeleton |
| 2021 09 07 | Sp17 | Cites DEC policy and procedure for decommissioning monitor wells. Small amount of flesh added to skeleton. |
| 2021 09 29 | Sp17 | Toward a reviewable version. This draws heavily from EPA guidance documents and Catskills experience. |
| 2021 10 01 | Sp17 | Reformatted for export as DOCX. |
| 2021 10 14 | Sp17 | Filled in many well installation details, bumped to 75%. |
| 2022 02 06 | Sp17 | Inserted a section 7 about installing our own driven wells. Numbers of earlier sections 7 and later are incremented by 1. |
| 2022 04 06 | Sp17 | Inserted a section 8 about installing our own drilled wells. Numbers of later sections are again incremented. Increase % completion to 80%. |
| 2022 05 17 | Sp17 | Cumulative update reflecting early experience at three sites with one augered PVC well and three driven steel wells. |
| 2022 07 12 | Sp17 | Updated to reflect recent practice. This includes experience from one augered PVC well and several steel wells. The steel wells are usually put into Giddings-augered boreholes; a few have been driven without a borehole. |
| 2022 08 09 | Sp17 | Added flags, empty bucket, and gloves to driven well checklist. |
| 2022 10 18 | Sp17 | Minor edits reflecting cumulative experience. |
| 2023 06 03 | Sp17 | Minor edits reflecting cumulative experience. The edits affect primarily the ability to go deeper with the Giddings because of buying two more Kelly bars and increased experience with well maintenance. |
| 2023 06 15 | Sp17 | Convert to Markdown, added material about removing a monitor well, other minor updates. |
1. Objectives
- Install monitor wells to yield samples representative of groundwater recharge from near pesticide use areas and facilities.
- Operate the wells responsibly (from the owner’s perspective).
- Remove the wells responsibly unless the owner takes them over for another purpose.
2. Intended usage of monitor wells
Monitor wells will be installed at categorical sites when there are insufficient existing, accessible wells to provide an adequate characterization of upgradient or downgradient pesticide concentrations in ground water. A Cornell SWL person will visit the well periodically (generally twice per year unless there is an analytical result requiring resampling) to purge the well and draw samples. Also certain measurements will be made onsite at each time of sampling.
3. Owner relations regarding monitor wells
The owner must be comfortable with Cornell’s installation of the wells, Cornell’s ongoing operation and maintenance, and Cornell’s removal when the site exits.
They also should be comfortable with the driller (Cornell personnel or a contractor) and the drilling process. The drilling process involves development of the well which generally involves pumping water from the well and may introduce deionized or potable grade water into the well. Drilling also generates solid cuttings which must be captured and disposed of; typically with Giddings augering we do not bring up many cuttings and nearly all of them are used to refill the borehole.
We encourage an owner representative to witness the installation of a well to gain comfort.
In production use, all monitor wells are purged before sampling, the few liters of removed water will either be discharged near the well or removed to a suitable disposal location. We prefer that the purge water simply re-infiltrate a few feet from the well.
There should be an optional written agreement with the owner if any monitor wells are installed. (There is less reason for a signed written agreement to simply sample existing wells.) No owner has needed a written agreement because of confidence in Cornell personnel, though we have provided templates to two of them.
4. Siting of monitor wells
NYSDEC specified that each categorical site will have one upgradient well and two downgradient wells. The downgradient wells would be located to tap groundwater that is recharged through an outdoor pesticide use area or a fugitive emission from indoors (such as a greenhouse). Specific monitor well locations will be highly site specific and depend heavily on the existence and suitability of wells already on the site. Suitable locations are discussed in HowTo: Site characterization for groundwater. We are varying from the 2+1 spec. Sometimes no upgradient well is needed.
Besides being able to measure recharge quality, a well must also be sited to remain out of the way of the site’s normal operation, including out of traffic paths. The well needs to be secure during mowing and snow removal.
The wells would also need to be reasonably accessible for sampling. Equipment such as pump and hose, and meters, will need to be carried between vehicle and wellhead.
The wells should be located so that purge water from the well can be disposed of onsite without collecting it; however if the owner requires Cornell to remove the purge water we will do that to an agreed destination.
5. Design of wells
Design elements that will vary from monitor well to monitor well include the total depth, the length of the screen, the diameter, and the path to access the well for sampling.
The Site Characterization activity will project the total depth of the well and how much seasonal variability of water table will occur. The total depth will be refined during drilling; the length of the screen will probably be fixed prior to drilling to span the expected water table range in most years. In the 2022 installations we have used 30-36 inch screens except for one well which has two joined screen segments.
Commercially installed monitor wells will be drilled in unconsolidated material typically using a hollow stem auger. The borehole will be oversized and packing material will surround the well tube to prevent leakage from the surface to the lower part of the well where water will enter. The well will be PVC 1.25” to 3” in diameter, in three segments. The bottommost segment is a short “sump” with a solid bottom cap where solids can settle – sometimes there is a solid section at the bottom of the screen segment. The next segment upward will be a narrow-opening screen of 2-4 feet in length depending on the dynamics of the water table and the total depth of the well. The upper segment will be solid PVC pipe. There will be a loose PVC cap on the top segment.
The PVC segments are usually threaded (NPT standard tapered threads) to fit together, except for the bottom and top caps. Alternatively they can be joined with PVC solvent primer and glue, potable water grade.
A dual-length screen can be used, by joining PVC or steel screen segments with a steel drive coupling.
The lower part of the well annulus will have a filter material of sand sized to prevent solids from entering the well through the screen. That material goes beneath the sump at bottom of the PVC well and extends to 1-2 feet above the top of the screen. Above this is an expanding bentonite grout that when hydrated will fill the upper annulus tightly so that no water can flow preferentially down the borehole. Finally there will be a cement cap at the surface. Embedded in the cement will be a steel well guard, of larger diameter than the inner PVC, that will project 2-3 feet above the surface. This will extend for 2-3 feet below the surface and have a removable, locking cap. The guard is to protect the PVC well from collisions.
For driven steel wells, the design is simpler. Below a beginning borehole 1-4 feet deep, made with post hole digger, there is no annulus thus there is no filterpack. The upper well annulus is dug out at larger diameter than the well, and that is filled in at the end with native material supplemented with bentonite. The owner may or may not want a steel guard at the top of the well. The well is painted bright orange for safety.
For augered PVC wells, the design is essentially the same as the commercially drilled well. There is an annulus and a sand filterpack is poured in around the well screen, a bentonite seal follows, and then a mixture of bentonite and hole cuttings is pressed into the annulus until the ground surface is reached. There is a slight mounding at the surface to direct runoff away from the well. A steel guard cap is optional. Because it is difficult to get paint to adhere to PVC, bright orange tape can be wrapped around the protruding part of the well for safety.
For augered steel wells, we typically drive the well deeper than the augered hole by pounding as with completely driven wells. We drive deeper when there is not at least 1 meter of saturated thickness after the water level re-equilibrates in the borehole after drilling. When a well is driven deeper than the borehole bottom, this limits the necessity of a sand filterpack in the annulus. It is generally not harmful to add sand to partly fill such borehole-with-driven, but there must be a bentonite seal atop the sand plus mixed bentonite and cuttings to the surface to avoid the annulus becoming a preferential vertical flow path which it would be if we refilled with sand all the way to the surface.
6. Installation of wells: commercial drillers
(There were no commercial drillers involved in the first 21 categorical site installations as of mid 2023. Cornell augered and/or drove all monitor wells.)
There will be a contract or purchase order between Cornell and driller, copy to the landowner. The driller will be selected based on familiarity with the area, experience with monitor well installation, and (whenever possible) confidence of the landowner.
The owner, Cornell, and landowner have the following roles on installation day:
- Owner:
- has given permission for the well site,
- is encouraged to witness part of installation process,
- is recommended to inspect afterward for safety issues.
- Cornell:
- Fully responsible to owner.
- supervises driller onsite during drilling.
- provides PVC parts of well (solid, sump with cap, screen), assembles as lengths are known, adjusts parts of well to length via threaded fittings.
- verifies cleanup afterwards (leaves last).
- Commercial driller:
- Drills,
- Captures, removes, and disposes of drill cuttings as specified,
- Installs filterpack under, around and slightly above PVC screen,
- Installs bentonite grout above filterpack,
- Provides and installs steel guard and cement for upper seal.
- Makes a stratigraphic log during drilling
- Provides written instructions about how to remove the well later, in compliance with the DEC standard for monitor well decommissioning.
Cornell visits again a day or more after drilling and sealing completion, to develop the well. (Allow sufficient time for the bentonite grout to expand; this is not urgent.)
“Development” is done by surging water in the well over the length of the screen using a device that fits tightly in the screen diameter at the bottom of the well, and has a pole reaching the surface; this will have threaded segments to adjust its length. Water naturally in the well can be used or local potable water can be added. The well is surged with the pole to get water and fine sediment to leave and enter the well through the screen and filter pack. Then the liquid in the well is pumped out to waste, removing with it sediment that has been sucked through the screen and the filterpack. The changing level of water in the well should be measured with the sounder to check for refilling rate (or exit rate if water is being added). When the pumped water is running clear and the entry or exit rate stabilizes, the development is complete.
Development may be included in the driller contract.
The steel well guard may be marked with Cornell contact information. Note that we don’t want to identify this as a pesticide monitoring well, so as to maintain the anonymity of the owner to any visiting DEC pesticide inspector.
7. Installing driven wells by Cornell personnel
As an alternative to hiring a driller, shallow wells in unconsolidated sedimentary material without large rocks can be installed by driving a pointed metal well by hand or with mechanized percussion, for example a fence post pounder. This should proceed very similarly to the installation by a contractor except that the labor is from Cornell personnel.
Driven wells are steel 1.25 inches nominal diameter, using water pipe standard dimensions; we measured a nominal 1.25 inch well as having an interior diameter of 1.35 inches. They consist of a string of solid pipe segments ending with a segment that contains a screen and ends in a sharp point; typically this is called a “sandpoint”. The interior diameter of the screen/point segment is slightly smaller than the diameter of the matching point segment because of the screen layer inside the perforated steel of the point segment. The segments are joined tightly with couplings. Each joint is sealed with potable-grade pipe joint compound completely covering the male threads of the pipe segments where they thread into the coupling’s female threads.
- The “borehole” begins with digging for at least the length of the screen/point segment using a post hole digger or small auger, deep enough so that the first segment and another coupled segment can be driven in without being too tall above the ground and there is still some latitude to adjust the entry angle of the string to be vertical.
- The screen segment should not be pounded on directly, only through a coupling and a solid pipe segment. The topmost segment is topped by a pounding cap that is hand tightened.
- Use the first interval (screen plus one solid pipe) to ensure that the well is entering the ground as vertically as possible; use a bar level with a bubble that works vertically to verify this.
- Tighten each pair of segments into the coupling using a pair of pipe wrenches above and below the coupling. The tighter the better, to ensure that subsequent pounding does not loosen any joints or break any couplings or pipe. This means that a new segment has to be added while the string’s top pounding cap is still 0.5m aboveground, so that the last pipe segment can be gripped with a pipe wrench aboveground while adding the coupling and the gripped new top segment.
- Paint on pipe joint compound to both sets of pipe threads before putting on the coupling. Fill all threads completely. This helps to keep out stray groundwater above the screen and lubricates the threads so the pipes can be tighter within the coupling.
- Periodically check for water in the progressing well using a sounder; which can also measure the depth of bottom of the well by feeling for when it cannot go any deeper. The minimum desirable water table thickness, from bottom of well to water table, is one meter plus the length of the screen segment. An extra meter beyond this is better if the well can continue to be driven deeper. However, we are trying to measure recharge quality thus a well that is too deep is also undesirable. Note that the well may be slow at refilling if pounding is going quickly or the screen becomes clogged from particulates encountered along the way. Allow the water level to stop rising before recording the water level. Total depth can be measured at any time.
- After the well is terminated, leave an agreed (with owner) amount of pipe aboveground, cap it with a steel final cap replacing the pounding cap, and refill the starter borehole with a mixture of the initial excavated material adding some bentonite to make a better seal and mounding the material above the land surface around the well. Then make the protruding part of the well visible for safety; orange paint is a good option on galvanized pipe.
- A steel guard around the well top may be desirable to protect the well against machine hits, wildlife, or vandals. This kind of guard is identical to the ones use with drilled wells. Lockable removable cap for access to the well inside, cement to a few inches below land surface and to several inches outward from the guard. Again, the steel guard needs to be visible for safety.
The owner and Cornell have the following roles on installation day:
- Owner:
- has given permission for the well site,
- is encouraged to witness part of installation process,
- is recommended to inspect afterward for safety issues.
- Cornell:
- provides well components, supplies and tools
- pounds in and tests the well, verifying water table position along the way
- captures, removes, and disposes of drill cuttings as specified,
- refills the upper pilot hole
- verifies cleanup afterwards
No stratigraphic log is possible except for water table position, since no subsurface solids are brought up intact except from the initial post hole.
Cornell visits again on the following day after drilling completion, or later, to develop the well. Almost identically to a commercially installed well, “development” of a driven well is done by surging water in the well over the length of the screen using a device that fits tightly in the screen diameter and has a pole reaching the surface; this will have threaded segments to adjust its length. Water naturally in the well can be used or potable water can be added. The well is surged with the pole to get water and fine sediment to leave and enter the well through the screen and filter pack. Then the liquid in the well is pumped out to waste (as agreed with the landowner), removing with it sediment that has been sucked through the screen. The changing level of water in the well should be measured with the sounder to check for refilling rate (or exit rate if water is being added). Repeat surging if necessary. When the pumped water is running clear and the entry or exit rate stabilizes, the development is complete.
Some wells do not require surging. Begin development by evacuating the well without surging. If the water is running clear and the refilling rate is adequate, then no surging is needed.
8. Installing augered wells by Cornell personnel
As an alternative to hiring a driller, shallow wells PVC in unconsolidated but somewhat cohesive sedimentary material, without large rocks, can be installed by drilling a borehole with Cornell’s Giddings powered auger. This should proceed very similarly to the installation by a contractor except that the labor is from Cornell personnel.
Some Giddings-augered wells are PVC 1.25 inches nominal inside diameter, using PVC schedule 40 pipe standard dimensions; a nominal 1.25 inch well has an interior diameter of 1.35 inches, and an outside diameter of 1.66 inches. Couplings increase the overall diameter at the coupled zone by another 0.25 inches. The well consists of a string of solid pipe segments ending with a segment that contains a screen and terminates in a short solid section with cap called a sump; the sump may also be an inherent part of the screen segment. The screen contains fine (0.01”) horizontal slots, smaller than the filterpack sand diameter that is put into the annulus around the well. The solid, screen, and sump segments are joined with NPT threads or couplings and solvent cement.
The “borehole” is Giddings-augered to about one foot deeper than the intended subsurface depth of the well. The material must be cohesive enough to stay open during drilling and after drill withdrawal; we have tools to clean out the auger hole if it is partly cohesive, or the auger can be used to lift out material within its spiral. The auger is 3” diameter This allows a minimum 0.5” annulus, in practice larger; a 4” auger hole leaves a minimum (4-1.66)/2=1.2 ” annulus.
- When using the corer, it is necessary to remove the corer to examine the material it has just encountered to make a crude stratigraphic log.
- Drill cuttings should be placed on a painter’s tarp or in a bucket so that they can be removed from the drill location during cleanup, unless the owner specifies otherwise. Start with some water if using a bucket so there is a mud produced, easier to use for refilling the annulus.
Periodically check for water in the borehole by examining what is brought up in the auger. We want the screen to be completely below the water table with say 2 feet extra, and also allowing for seasonal water table fluctuations between drilling time and the expected annual low.
Fill the bottom of the borehole with 3-6 inches of filterpack sand.
Assemble the well to final length, including any protrusion above the land surface. Assembly is either screwed or with PVC primer and cement. Allow enough time for the cement to cure.
Insert the assembled well and position it in roughly the center of the borehole. Pour additional sand around the annulus to about 1 foot above the top of the screen. It does not hurt for sand to be higher, as long as there is room for a bentonite plug above the sand. Thus err on the side of extra sand if there is any uncertainty about how far down the sand is. The well may be moved slightly from side to side while pouring to ensure that there are no voids below it.
Pour powdered bentonite about 1 foot deep above the top of the sand. Wet it with potable water or water pumped out of the well; this may also be wetted with soil moisture, slowly. This is the bottommost seal.
Add a mixture of deionized/potable/site water, bentonite powder, and drill cuttings into the annulus until it reaches the surface. Mound it up around the protrusion of the well above the land surface so that any rain running down the outside of the well will run off sideways rather than infiltrate.
A steel guard around the well top may be desirable to protect the well against machine hits, wildlife, or vandals. This kind of guard is identical to the ones use with drilled wells. Lockable removable cap for access to the well inside, cement to a few inches below land surface and to several inches outward from the guard. Again, the steel guard needs to be visible for safety. This guard should be light enough to be lifted out of the ground (including the cement part) by one person at well decommissioning.
Note: It is possible to use the auger in combination with a steel well in material that is not cohesive enough leave an open borehole, or in which the steel well needs to be driven deeper than the maximum reach of the auger to reach enough saturated thickness. The auger loosens the material from surface to bottom, making pounding in the well (see section 7 here) easier than if the well is pounded without a long borehole. After pounding in the well deeper, the thickness of borehole annulus sand (filterpack) should be scaled to the amount of screen still above the bottom of the borehole, i.e. reduce the sand depth by the distance pounded.
The owner and Cornell have the following roles on installation day: - Owner: - has given permission for the well site, - is encouraged to witness part of installation process for one well, - is recommended to inspect all installed wells afterward for safety issues. - Cornell: - provides well components, supplies and tools; - Drills the borehole, inserts the well, fills the annulus, and tests the well, verifying water table position along the way; - Captures, removes, and disposes of drill cuttings as specified; - Marks the protruding part of the well for safety. Painting it bright orange is recommended; - Cleans up afterwards
Cornell visits again at least one day after installation, to develop the well. See section 7 of this HowTo for the procedure.
9. Maintenance of wells
See Howto: Sampling road trips for well maintenance and equipment to carry on trips that will visit any of our monitor wells.
The surface seal of the well may change after initial installation. (Some soils contain enough clay to shrink and swell with the degree of wetness.) The seal integrity should be inspected at each visit and any cracks sealed with bentonite, which will need to be part of the standard sampling road trip kit.
We discovered that the water yielded by zinc-galvanized monitor wells contains high zinc concentrations, and that some wells contain a white powder (presumably zinc oxide) near their exposed tops. We decided not to remedy this since zinc is not an important parameter and we don’t believe that it will interfere with other analyses. We will invalidate all zinc analysis results from our steel wells.
The threads inside metal well caps (ungalvanized) and outside top pipe segments tend to rust together when not opened for several months. We bring two pipe wrenches to be able to get the caps off. The caps do not need to be tight – hand semi-tight is fine. Two techniques have worked to break loose a rusted-on cap: - Tapping the cap around its rim with a hammer or other heavy object. The percussion sometimes breaks loose the rust. - Using two pipe wrenches (same size used for threading together pipe and screen segments during installation), one on the cap and one on the protruding part of the topmost pipe segment of the well. Place these in opposite orientations so that twisting motion counterclockwise on the cap will push the pipe deeper into the jaws gripping the pipe if the pipe twists at all. The pipe-gripping wrench can be stepped on or pushed downward with one hand to keep the well from twisting, while the wrench on the cap is turned to break loose the cap. It may help to have a wood block on the ground under the pipe-gripping wrench.
Orange paint did not adhere to PVC wells thus we are replacing it with bright orange tape.
Orange paint on steel wells is more durable, but we carry spray paint on sampling trip sto do refreshes.
10. Removal of wells
DEC policy and procedures for decommissioning of monitor wells will be followed (NYS DEC, 2009). If the owner wishes to reuse the well for another purpose and the well is suitable for that purposes, that is allowed.
The essence:
- Remove the well. This requires gripping and lifting. The Giddings auger machine can provide lift, or a tripod with a winch can be used. A long steel well is heavy, thus it helps to have more than one person gripping and lifting. Some people (Youtube videos) have success with levering out a well using a pipe wrench and wood block on the ground, inch by inch. When the initial grip of ground on well is broken, it will be easier to withdraw.
- A steel well can be disassembled on the way up with a pair of pipe wrenches to reduce weight, however be careful to keep a solid grip on the top of what is still underground so it doesn’t fall back into the borehole and become unrecoverable.
- PVC wells are light and can be removed intact. They will need to be sawed at the couplings to carry them if they are longer than around 10 feet.
- Fill in the borehole with native soil and liberal amounts of bentonite powder so that there is no way for water to have a short-circuit path to the water table through the hole made by auger or driving.
11. Well descriptions for DEC EQuIS
EQuIS has provision to enter stratigraphic logs of monitor wells. These data will not be very useful in EQuIS due the location blurring for confidentiality; however when we have stratigraphy we will submit it as context for samples from the location.
Wells installed by Cornell do not have stratigraphic logs. Data are limited to total depth inside from the rim, and projection of the well rim (without cap) above the local land surface.
12. References
NYS DEC. 2009. CP-43:Groundwater Monitoring Well Decommissioning Policy. URL:
https://www.dec.ny.gov/docs/remediation_hudson_pdf/cp43mwdecomm.pdf. This also attaches a similarly titled procedural document. Retrieved 9/7/2021.
US EPA. 1991. Handbook of Suggested Practices for the Design and Installation of Ground-Water Monitoring Wells. EPA 160014-891034
13. Checklists
These overlap. When a trip is multipurpose, combine these and eliminate the duplicates.
This assumes only limited parallelism. We have only one of certain critical items. However multiple wells at a site can be worked on in parallel if they are in different stages, i.e. develop first well while second well is being driven.
13.1 Driven well installations
These items are taken for all Giddings installs also, in case we want to drive a well into the borehole farther.
- Galvanized steel solid pipe segments.
- Galvanized steel drive couplings
- Galvanized steel screen segments.
- Final well caps.
We take enough of the above for every planned well, plus a few spares.
Well pounding caps (at least two, the threads are not durable); there is also a combination of 6” nipple, coupling, and pounding cap that we have been using instead of the cap separately.
Pipe dope (white paste); includes brush in container. Potable well grade.
Bentonite powder to seal at the surface or to fill in abandoned hole.
Two pipe wrenches with 15-24 inch handles for leverage, with grippy teeth (not too worn out).
Large pipe wrench as backup if we need more leverage.
Well hammer.
Grippy-palmed gloves for hand protection and to hold the hammer.
Medium weight hammer for final pounding close to ground. (Short handle sledgehammer.)
Tape measure.
Posthole digger.
Heavy spike. (alternative to posthole digger when there are modest stones)
Shovel.
Empty bucket to accumulate dirt from post hole digging.
Garden trowel to use as scoop for bentonite and small digging.
Small 2-bladed digger. (Mini pickaxe.)
Rags or paper towels.
Washwater (if can get at site, bring empty containers)
Level to check for vertical orientation. We have been doing this by eye, and it works OK.
Low flags to record agreed positions of wells before digging.
Tall flags for permanent well positions in weeds. Sometimes we leave a small flag instead.
Well depth sounder. Spare 9V battery.
?? Jack to lever out broken wells from ground. Wood platform for jack. ?? The Giddings may be able to be used to pull out wells.
?? Means to attach jack to well for levering; chain to wrap, steel cable with clamp to attach to well, long-handled pipe wrench if well is protruding from ground surface. ??
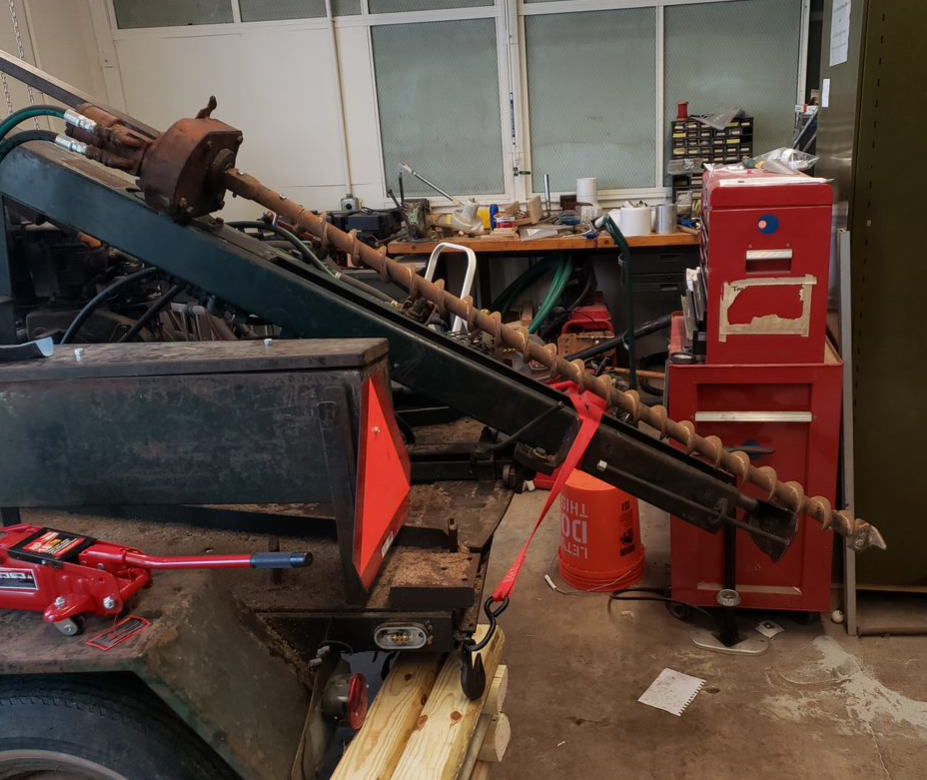
13.2 Giddings augered well installations
We move the Giddings trailer with two tarps over the motor and hydraulic tower to exclude rain.
- PVC well segments: screen, bottom cap, solid pipe 4 and 6 foot, plain to plain couplings. These are all 1 1/4 inch nominal PVC sizing.
- PVC cement, PVC primer. These have applicators in caps.
- Upper final PVC well cap (oversized 1 1/2, fits loosely).
- PVC saw (such as a backsaw).
We prefer PVC wells, but also bring steel well components to pound (see 13.1) if borehole cannot be kept open or if we wish to drive well deeper than the borehole depth.
We take extra PVC well components on each trip, beyond the maximum number planned, to allow for breakage and unexpected extra deepness.
Tape measure.
Hearing protector for persons closest to Giddings motor.
Level to check verticality of bits and well.
Shovel.
Post hole digger.
Tools to dig out debris from borehole. (Borrowed from Bob S)
Narrow rake.
Painter’s dropcloths (plastic).
Empty buckets.
Wire brushes to remove dirt from auger.
Bilge pump to evacuate borehole, with sufficient intake and outflow hoses. Not used for inside wells!
Board or tarp to knock dirt onto from auger that is not detached, to save up for borehole refilling.
Level capable of measuring vertical orientation of well.
Note: We also take a steel driven well kit whenever we take the Giddings auger. We often end up driving a well into the borehole to get extra depth.
Giddings drill trailer specific items:
10W40 oil for motor. Funnel with narrow, flexible neck to reach oil input at base of motor. 1 quart.
Automatic transmission fluid (used as hydraulic fluid). At least 1 quart.
Fresh ethanol-free gasoline in secure can. At least 1 gallon. Between trips can with gas is stored in gasoline cabinet in room B69 west.
Fully charged 12V battery. Carry in truck, not in Giddings battery box. Wrench to tighten nuts on battery cables.
Tiedowns for mast, both ends. Rachet straps 1000 lb break strength; bring at least one spare because cannot drive without two of them.
Tarp and bungees to cover motor while driving. Always use this when there is any chance of rain more than a brief drizzle. Cover the muffler especially. Multiple bungees per tarp, for ends and middle. Cover to prevent from flapping.
Second tarp over the tower, used if it is raining or for overnight parking, with tiedowns or bungees.
Starter fluid spray. Spare full can.
Disposable rags.
Wheel chocks, at least two. Can also use large wood blocks.
White lithium grease in spray can. For lubricating the joints between Kelly bars and auger.
Narrow blade paint scraper and file for inside drill segment joins. Most important is to get the mud out of the joints.
Auger bits and square kelly bars (8 ft and 6 ft lighter bars, 6 ft heavier bar, shorter and longer augers.)
Type 8 hardened 3/8” hex bolts and nylon-augmented nuts for joining drill segments. 16 threads/inch (coarse). Wrenches matching these, box/open and socket with ratchet. Bolt heads and nuts are 9/16”. Plenty of spares both bolts and nuts. Lengths are 1 3/4 (Kelly to Kelly only), 2 1/4 (Kelly to auger), and 3 inches (temporary holding in frame). A few non-nylon nuts.
Wooden footer block for the drill tower. Bring a spare.
Wooden Auger holder to prop the drill string while detaching and attaching Kelly bars. This fits between the auger spirals and can also hold a Kelly bar if there is a bolt through one of its intermediate holes.
1/2 inch lug wrench in case spare tire is needed. 6-point 1/2 socket 13/16 (drive wheels) and 3/4 (spare).
Jack to raise trailer or truck wheel to swap tires. Wooden support beneath; two boards that we are leaving in truck usually because the truck does not have its own jack.
- Red jack stand.
Special socket for spark plug 7/8” deep 1/2” drive, matching ratchet.
Extra wood blocks, 4 by 4 or larger.
General tools and supplies for any drilling trip:
- Screwdrivers: large and medium flat and Phillips.
- Hacksaw.
- PVC saw (also useful for wood).
- Kobalt pliers.
- Open/box wrench set.
- Adjustable wrenches medium and large.
- Simple Green spray cleaner.
- Paper towels.
- First aid kit.
==========
Checklist for any type of monitor well development (see also sampling HowTo if sampling on same day as development):
- Well sounder to measure water level in well. Two meters if there are two wells to develop at a site.
- Well surger(s) sized for the well(s), threaded rods for the needed length. Two sets if there are two wells to develop.
- Deionized or potable water to add to well if the natural level is low.
- Optional: pH/temperature/conductance meter. Check for reasonable accuracy before taking to field.
- Optional: Graduated cylinder to measure effective pump rate.
- Optional: Graduated bucket to hold purge water.
- Timer (can be wristwatch).
- Peristaltic pump with development hoses. Two pumps if there are two wells to develop at a site.
- Field waterproof logbook with compatible pens.
- Tape measure – making final measurements of installed well.